AwesomeEFIS configuration
Configure RADaero devices with the EFISConfig webapp. It runs in Google Chrome or Microsoft Edge on Windows, Mac and Linux.
Connect
- Connect the EFIS to your computer with a USB-C data cable. Charge-only cables will not work.
- Open RAD.aero/EFISconfig.
- Click Connect on the page (marker 1), select AwesomeEFIS in the popup (marker 2), then click Connect in the popup (marker 3).
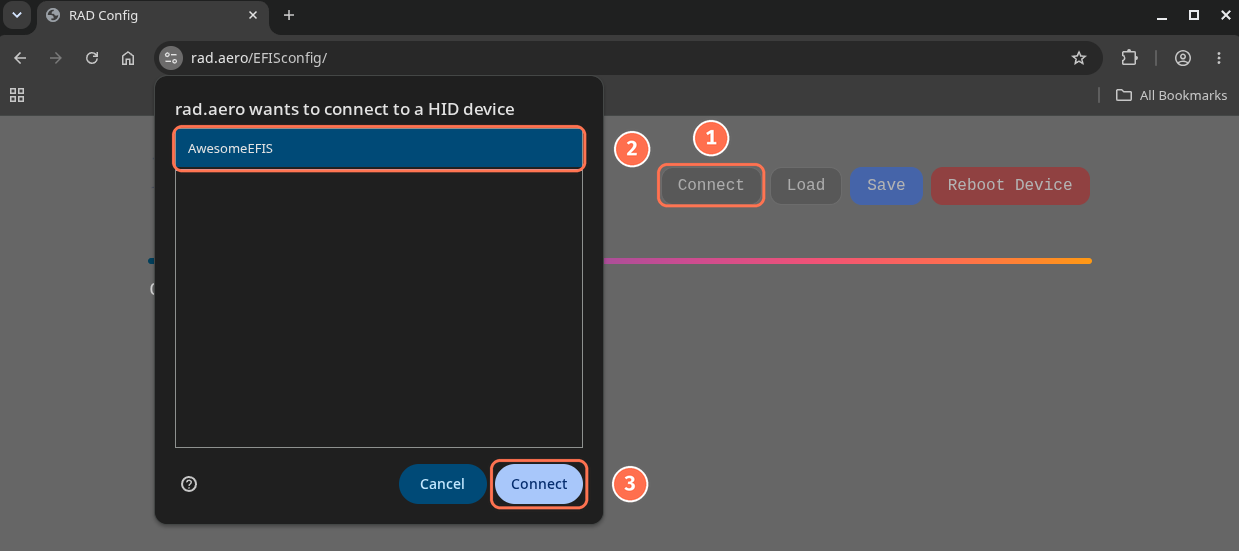
Settings load automatically once the device connects. Changes are not sent until you click Save.
Extra Displays are configured automatically over RADbus from the configuration stored on the EFIS. The Devices card lists every device found on the bus with its firmware and airport database versions.
Settings
Remember to click Save at the top of the EFISConfig page after making changes. The AHRS, Airspeed and Vertical Speed pages have live previews that update when a setting changes.
Registration number
Select the prefix for your aircraft's registration country and enter your registration number.
Units
| Setting | Options |
|---|---|
| Airspeed | MPH, Knots, KPH |
| Altitude | Feet, Meters |
| Temperature | Fahrenheit, Celsius |
| Pressure | InHg, Mbar |
| Distance | Nautical Miles, Statute Miles, Kilometers |
Screen setup
Colors are adjusted by clicking the colored box of the item you want to change. A color picker will open to change the color of the arcs, approach and gear indicators, sky, ground or airplane symbol.
Screen Brightness is adjusted automatically based on the calculated angle of the sun above / below the horizon. The screen gradually adjusts the brightness between the daytime and nighttime settings during sunrise and sunset. When the center of the sun is 3 degrees below the horizon, the Nighttime brightness value is used.
Text Background Alpha adjusts the transparency of the black cutouts behind the number displays.
Show Density Altitude turns the density altitude display on or off.
Use Magnetic Heading GNSS ground track is used by default, to enable the internal magnetometer check this box and perform a magnetometer calibration in flight. See Magnetometer Calibration.
| Setting | Default |
|---|---|
| Daytime brightness | 15 |
| Nighttime brightness | 5 |
| Text background alpha | 160 |
| Show density altitude | On |
Screens
Check or uncheck each screen to control which screens are available on the devices. Uncheck a screen to remove it from the screen menu. At least one screen must stay enabled. All screens are enabled by default. See the screen list.
V-speeds
Enter the V-speeds of your aircraft in the airspeed units selected above. Allowed maximum values depend on the maximim airspeed selected when ordering the EFIS.
The following items can be disabled by entering a value of 0:
- White arc: set both Vs0 and Vfe to 0.
- Approach indicator: set approach speed to 0.
- Gear indicator: set Vlo to 0.
Minor tick marks can be enabled / disabled.
| Speed | Where it shows | What to enter | Default |
|---|---|---|---|
| Vmin | First value on the airspeed screen gauge | 20 | |
| Vs0 | Bottom of white arc | Stall speed in the landing configuration (dirty) | 50 |
| Vs1 | Bottom of green arc | Clean stall speed or minimum steady flight speed | 60 |
| Vfe | Top of white arc | Maximum flap extension speed | 80 |
| Vno | Top of green arc, bottom of yellow arc | Maximum structural cruising speed | 110 |
| Vne | Top of yellow arc, bottom of red arc | Never exceed speed | 130 |
| Approach speed (Vref) | Magenta indicator | Approach speed in the landing configuration, typically 1.3 x Vs0 | 70 |
| Vlo | Orange indicator | Gear extension speed | 75 |
A live preview is generated based on the speeds entered, contact support@RAD.aero if additional customization is needed.
Enter your aircraft's own speeds
The defaults are placeholders, not values for your aircraft.
Voltage warnings and alerts
The background behind the bus voltage changes color with the measured voltage:
- Yellow: beyond a warning level, but within the alert levels.
- Red: beyond an alert level.
| Level | Min | Max |
|---|---|---|
| Warning | 13.5 V | 15.5 V |
| Alert | 12.5 V | 16.5 V |
Attitude correction
Roll and pitch correction zero the displayed attitude in straight and level cruise, compensating for how the instrument is mounted relative to how the aircraft flies.
- Perform a test flight and note the roll and pitch angles shown on the EFIS.
- Enter those values and click Save.
| EFIS showed | Enter |
|---|---|
| Nose high | Positive pitch correction |
| Nose low | Negative pitch correction |
| Left wing high | Positive roll correction |
| Right wing high | Negative roll correction |
G-meter
Sets where the arcs start on the G-meter screen. To disable a yellow arc, set its yellow start to the same value as its red start.
| Setting | Default |
|---|---|
| Yellow start + | 3.3 G |
| Red start + | 3.8 G |
| Yellow start − | -1.02 G |
| Red start − | -1.52 G |
Map
The displayed map can be rendered as North Up or Track Up. Additional configuration is only used in conjuction with an AwesomeADSB.
| Setting | Options | Default |
|---|---|---|
| Map orientation | North Up, Track Up | North Up |
| NEXRAD opacity | 0-100% | 60% |
| Traffic filter ± | Only draws traffic within this altitude above or below you. 0 shows all traffic. | 0 |
ADS-B
Sets the ownship identity the AwesomeADSB picks up over RADbus: ownship ICAO (hex), emitter category, and whether to use the assigned ICAO or a random address. These settings control the GDL90 ownship output from the AwesomeADSB to any external electronic flight bag apps to prevent your own ADB-B out transmissions to be shown as a target.
Factory reset
Factory Reset erases the stored settings on every connected device, back to firmware defaults.
Configuring on Linux
A udev rule is needed to allow access to the device. If the udev rule is not installed, the connection fails and the EFISConfig page shows instructions to install and activate it.